Table of contents
- Business Continuity Plan
- Disaster Recovery Plan (DRP)
- RPO and RTO – the most important values in a contingency plan
- What should a Disaster Recovery Plan contain?
- 1. A list of the hardware and software in use
- 2. Assessment of criticality of particular areas
- 3. Risk and business impact assessment of the Disaster Recovery process
- 4. Setting the post-disaster recovery goals
- 5. Creating an exhaustive document
- 6. Placing the DRP in a secure location
- 7. Plan testing and improvements
- 8. Regular staff training and document updates
- Backup and Disaster Recovery Centre
- Good Disaster Recovery plan in Google Cloud
Today, the operations of many businesses rely on the availability of IT systems. Many companies, operating so far in the offline domain only, have undergone a rapid digital transformation as a result of the pandemic. Entering the online world translates, on the one hand, into a better workflow and greater flexibility and, on the other hand, into almost total dependence on technology.
And failures do happen. Because of a service provider’s oversight or negligence, an employee’s mistake, a hacker attack, or even a natural disaster. Regardless of the reason, such incidents can lead to huge losses. Some companies are forced to shut down their business because they’re unable to restore their current workflow or a lost app or data. Or because the cost of retrieving and restoring such apps or data is simply too high.
According to studies, the average cost of a minute of downtime of a system used by a large enterprise is between USD 5,600 to USD 9,000 (Gartner, Ponemon Institute). In the case of small and medium enterprises, the cost of a minute of system downtime ranges from USD 137 to 427 (Carbonite). A 13-minute downtime of Amazon.com in 2015 cost the company over 2.5 million dollars. And these data concern only the downtime in the provision of services – not a loss of a system or information and costs of their restoration.
Each minute of system unavailability translates into more and more losses. That’s why it’s so important to make sure that the data and all the crucial elements of an app are safe and secure, to develop a contingency and crisis management plan, and to train staff members accordingly to be able to get the website affected by a failure back up and running as soon as possible.
Business Continuity Plan
A Business Continuity Plan makes it possible to efficiently manage crises in crucial business areas and to minimize the negative effects of adverse incidents. A BCP should take into consideration situations such as:
- a natural disaster (earthquake, flood),
- a building failure (flooding, fire, structural collapse),
- a transport accident (e.g. in the case of forwarders),
- theft or destruction of physical documents,
- theft of company hardware,backup
- an IT system getting hacked.
A BCP should list all areas of crucial importance to the company’s activity – for instance, maintaining physical documents intact, maintaining the building where the company’s headquarters or archive is, and keeping employees safe in the face of a disaster.
Each crucial business area should come with a detailed process of response, including communication guidelines (e.g. who to notify in the event of an incident – and in what order) and information about the next steps to take. The instructions should be presented in the clearest way possible, and staff should be trained in case of an emergency. The document itself and its copies should be secured and present in several locations – in order not to lose the instructions if some adverse event occurs.
In the case of companies whose core operations are based on technology, a must-have in their Business Continuity Plans is a Disaster Recovery Plan – a plan of action which describes the steps to take to recover systems and data after a failure.
Disaster Recovery Plan (DRP)
A Disaster Recovery Plan is a document containing a description of procedures to follow in the event of an IT disaster – an incident taking place at an own data center, a problem on the service provider’s end, malfunctioning of the app, a system critical error, or downtime in the availability of digital work tools.
The aim of a Disaster Recovery Plan is to make an app (i.e. an entire app or its crucial parts) work again in a stable manner and to restore access to data and the possibility to process the data further as quickly as possible. A quick and well-thought-out response is to shorten the system downtime and mitigate the negative impact of the downtime.
For instance – let’s imagine we have a chain of brick-and-mortar stores and an e-commerce website. We should adopt security measures in case of events such as:
- a critical error occurring in the production version of the e-store,
- an ERP system outage,
- a hacker attack, data theft or leakage,
- a data centre failure and resulting unavailability of the website or the ERP system,
- a mail server failure,
- a customer service system downtime (also through the fault of the service provider),
- failure of a payment terminal or the POS system.
If any of these situations is crucial to the functioning of our business, our Disaster Recovery team should take it into account these Disaster Recovery procedures.
RPO and RTO – the most important values in a contingency plan
A Disaster Recovery Plan should include two metrics – a Recovery Point Objective and a Recovery Time Objective. Disaster Recovery focuses on both these time-based values, usually expressed in minutes or hours.

Recovery Point Objective (RPO) is a value describing the period of time covered by the last backup or transfer of data to the Disaster Recovery Centre. If an app is significantly modified every few minutes, the RPO should be a few minutes long. If updates/modifications are less frequent or less critical, the RPO value can amount to even several hours.
Recovery Time Objective (RTO) is a metric determining the maximum time allowed to restore full functionality after a disaster – meaning the maximum allowed duration of system downtime. RTO is often a component of a Service Level Agreement (SLA) so determining its value is crucial to e.g. the fulfilment of the terms of the agreement concluded with a client.
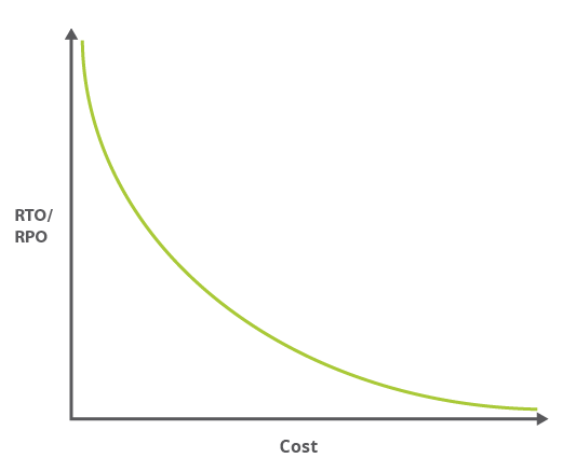
The lower the values of the Recovery Point Objective and the Recovery Time Objective (the quicker we intend to restore the latest version of the system), the higher the cost of restoration after a failure.
What should a Disaster Recovery Plan contain?
The question of what areas to cover and what measures to take in the face of a crisis should be answered individually by each company and will differ for each system.
But there are a few universal steps to follow when developing a Disaster Recovery Plan. These Disaster Recovery methods include:
1. A list of the hardware and software in use
The first step is the “IT survey” – drawing up a list of the electronic and digital products in use, which are essential to the functioning of the company – and which are prone to failure.
Such a list of regular disaster recovery testing should include e.g.:
- the tools in use, provided by third-party providers (e.g. mail server, business apps, ticket system),
- the physical equipment (e.g. data storage devices, computers or servers owned by the company),
- the rented virtual assets (e.g. hosting in a private or public cloud),
- the most important digital documents and the place of their storage,
- app elements or databases – with the indication of their respective locations.
2. Assessment of criticality of particular areas
The next step is to assess the level of criticality of particular elements. We need to identify the areas that will suffer in the event of a lack of access to certain information or tools and determine the impact of such a situation on business continuity.
3. Risk and business impact assessment of the Disaster Recovery process
It’s important to determine the potential threats to particular areas and consider the consequences such threats entail. We need to take into account minor incidents (e.g. a page error resulting in a few minutes of downtime) as well as the worst-case scenarios (e.g. complete destruction of the data centre along with application files).
It’s a good idea to estimate the financial value of particular elements by making use of information about the income generated by a given area. There are many formulas to calculate the cost of even a minute of system downtime to be found online.
Identifying potential incidents and their effects makes it possible to set feasible goals and adopt realistic indicators in the following steps of the plan development.
4. Setting the post-disaster recovery goals
With a list of top-priority elements ready, it’s necessary to determine the RTO and RPO for individual areas. If a given element is critical, the time to restore its latest version should be as short as possible. The recovery goals should be accompanied by post-disaster recovery processes and strategies. For example, if a company provides a high service level, it should make sure that the response from its Disaster Recovery Centre is as quick and efficient as possible.
5. Creating an exhaustive document
The information mentioned above – the list of app elements, the tools and equipment in use along with priorities – should be written and incorporated in a clear and understandable manner in a single document. DRP should be a guide meant for internal and external communication, for those who become aware of an incident, enabling them to react quickly, and in an organized way.
A Disaster Recovery Plan should include e.g.:
- a list of the digital tools in use and/or of own developed products,
- a list of the physical equipment and virtual assets in use – with the indication of the provider,
- a list of employees in charge of a given area,
- a list of details of the contact persons who need to be notified of the incident,
- a schedule of activities that need to be undertaken in the event of a given incident, covering e.g. a description of the incident, a description of losses, sending service outage notifications to users, an indication of the steps to follow to bring the system back to operation (e.g. the path to the backup file or a guide on how to launch the Disaster Recovery Centre),
- a description of actions that need to be taken after the system start, e.g. a load test, an analysis of the situation that has occurred, or a description of the event; the so-called post-mortem.
6. Placing the DRP in a secure location
The document and its copies should be found in several locations which are easily accessible to employees. A Disaster Recovery Plan should never be located in the same place as other crucial files and data because, in the event of a disaster, you’ll lose access to it as well.
For instance, if you have your own data centre, you can keep your DRP document on another, geographically remote server – or in the cloud.
7. Plan testing and improvements
The next step to take is to test the plan and all of the related procedures. This will make it possible to review the adopted indicators, identify the areas of potential threat, and improve the plan in general.
This step is very important – it often appears only in practice that some points need to be considerably modified. The tests will also show the areas that require a greater emphasis on staff training.
8. Regular staff training and document updates
It’s important to design and run a training program for your people. The training should be revised on a regular basis – and so should the Disaster Recovery Plan.
Backup and Disaster Recovery Centre
A backup involves copying essential elements of an app – e.g. files with the source code, databases, electronic documents – and placing them in another location. But this solution may not always be enough. If we lose access to our infrastructure, restoring our assets from a backup in a different environment may take from several dozen minutes to several hours or even days. Also, it may be impossible to recover all data – let’s assume that the backup is every day at midnight and our site crashes just after 11 pm. We lose all data we have been collecting for the last day.
A Disaster Recovery Centre (DRC), in turn, is a backup data centre operating 24/7. It’s a geographically remote location with a backup of your business infrastructure, which connects with the primary infrastructure and stores a copy of the entire system and all databases. If there is a failure at the primary centre, the traffic can be diverted to the backup centre – so quickly that the users of the affected app won’t notice any effects of the outage.
There are three models of a Disaster Recovery Centre:
- an on-premise Disaster Recovery Centre as an own backup data centre. It should be geographically distant enough to be able to survive a potential disaster, but at the same time communicated well enough to have the data transfer speed as high as possible. Such a solution is expensive because we need twice as much resources (costs of building and security measures, physical equipment, specialists) as necessary to maintain the primary data centre;
- an off-premise Disaster Recovery Centre, meaning an external data centre, owned by a selected service provider. The service provider needs to offer high standards in the area of physical safety of hardware and network, connection stability, data transfer speed, or service availability. The cost of “renting” an off-premise DRC is often lower than that of establishing an own on-premise DRC;
- Disaster Recovery as a Service (DRaaS) – a backup data centre in the cloud. The DRaaS service involves making a copy of an entire system environment to store in the service provider’s cloud. Starting the system in emergency mode is relatively quick and easy because the infrastructure is managed via a web browser console, and the RTO value can be even several minutes.
Good Disaster Recovery plan in Google Cloud
Google Cloud Platform offers service availability at the level of 99.95-99.99%. It has its own fibre-optic network connecting over 70 data centres across the world. Some locations are combined into regions in order to guarantee a higher level of service availability in case of a failure or a disaster. A region is a formation composed of at least three zones, where two act as a Disaster Recovery Centre and keep the app alive in the event one data center is destroyed.
Google’s infrastructure supports quick recoveries after a disaster thanks to e.g.:
- a global network consisting of hundreds of data centres and dozens of thousands of fibre-optic cables connecting these centres,
- redundancy ensured thanks to the many PoPs (points of presence) and automatic copying of data between devices in different locations,
- scalability, which makes it possible to handle a load a dozen times greater than usual within a fraction of a second; in the case of many services, scalability is an automated process,
- reliable security measures, developed for 15 years by a team of hundreds of cybersecurity and infosec specialists,
- compliance with legal regulations and requirements, such as e.g. ISO 27001, SOC 2/3, or PCI DSS 3.0 certification.
Apart from the high availability and performance offered by Google Cloud Platform, another great advantage is the support provided by certified specialists. Local Google Cloud Partners are able to support organizations in the development of an appropriate Disaster Recovery Plan and preparation of a stable Disaster Recovery Centre in Google cloud.
Google cloud architecture – zones and regions
Public cloud infrastructure has been developed with the idea to ensure high service availability by default, also in the face of a disaster affecting the provider’s data centres.
Today (i.e. as for April 2021), Google Cloud comprises 76 zones combined into 25 regions. What are zones and what are regions?
A zone is an availability area, as determined by the user when configuring a service (e.g. virtual machines in Compute Engine). A zone is not a data centre – there is a layer of abstraction between a zone and a cluster of physical machines inside Google’s server room. A zone may consist of one or more such clusters, but it’s not assigned permanently to specific devices in a specific data centre.
Meanwhile, a region is a collection of at least three zones. Zones found in one region have high-bandwidth and low-latency (under 5 milliseconds) connections.
A Google Cloud Platform user may determine the location for service data to be hosted as:
- zonal – within one zone,
- regional – within several zones in a region,
- multi-regional – between two or more regions.
When deploying an app in the zonal model, we’re exposed to the risk of failure caused by e.g. a natural disaster. Deploying an app in the regional model guarantees a higher level of availability thanks to data transfer and balancing the load between the resources across different zones. It makes it possible to minimize downtime and maintain a high level of availability even if some major adverse event occurs at the physical data centre. The multi-region model ensures global availability – e.g. across continents – and provides protection against the effects of a failure of an entire region (which is what happened to the AWS Cloud in 2017).
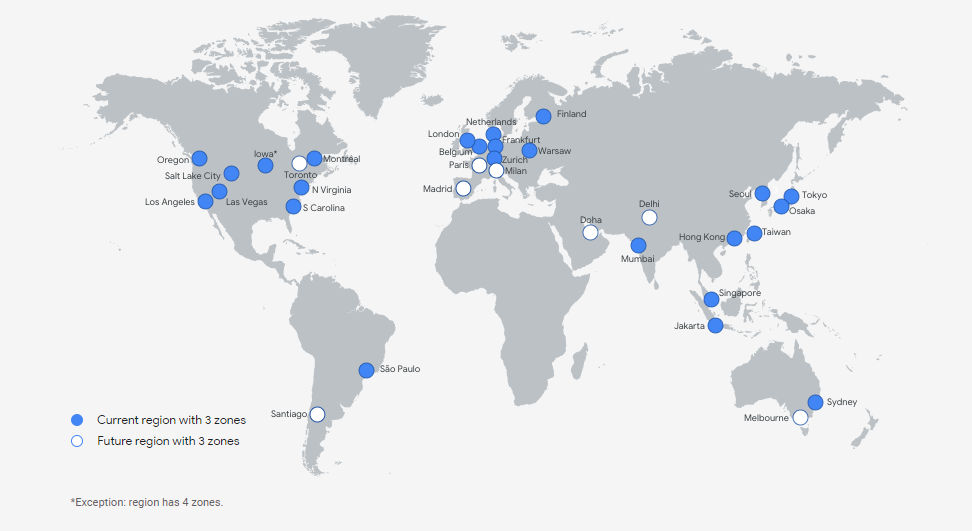
Since data are not stored on specific machines but continuously divided, replicated, and distributed among machines found in different locations, a failure of the physical data centre does not have much impact on the availability of an app hosted in the cloud. In the event of a data centre failure, the resources and access are automatically transferred to another data centre so that Google Cloud users experience no downtime when using the affected app. Data centres feature also emergency backup generators that supply power to buildings and machines in the event of a power outage. There are administrators and security specialists working 24/7 in each centre. They make sure that both Google services and apps, as well as clients’ resources, are fully available and operable on a continuous basis.
Disaster recovery planning & patterns available in Google Cloud Platform
Google Cloud Platform makes it possible to develop a scenario of post-disaster recovery based on the following three patterns:
- cold – involving a system downtime until the data are restored,
- warm – involving a short downtime, only until the replacement resources are deployed,
- hot – involving a continued system operation and, quite often, automatic repair or recovery.
In a video from the “Get cooking in Cloud” series, linked a few paragraphs above, Priyanka Vergadia describes the said three models using the example of baking cakes and cookies for a party. The mixer she uses starts making some disturbing noises, which implies that the device may break down sometime soon;
- in the cold model, Priyanka may stop her preparations and call the mixer company and have them fix the device; such a solution, however, will slow her down considerably and make it impossible for her to have the cakes and cookies ready for the party,
- in the warm model, she may pause her preparations for a while and try to fix the mixer herself by following the instructions provided in the manual; she will lose some time, but she’ll probably manage to get everything done on time,
- in the hot model, she continues using the mixer at a slow – safer – speed and carries on with the preparations, deciding to fix the mixer later.
Examples of Disaster Recovery Strategy for apps
In the case of an on-premise production environment
In a cold pattern, we have minimal resources in the DR Google Cloud project – just enough to enable a disaster recovery scenario. Here, the Disaster Recovery building blocks will be:
- Cloud DNS,
- Cloud Interconnect,
- Self-managed VPN,
- Cloud Storage,
- Compute Engine,
- Cloud Load Balancing,
- Deployment Manager.
The following diagram illustrates this example of disaster recovery architecture:
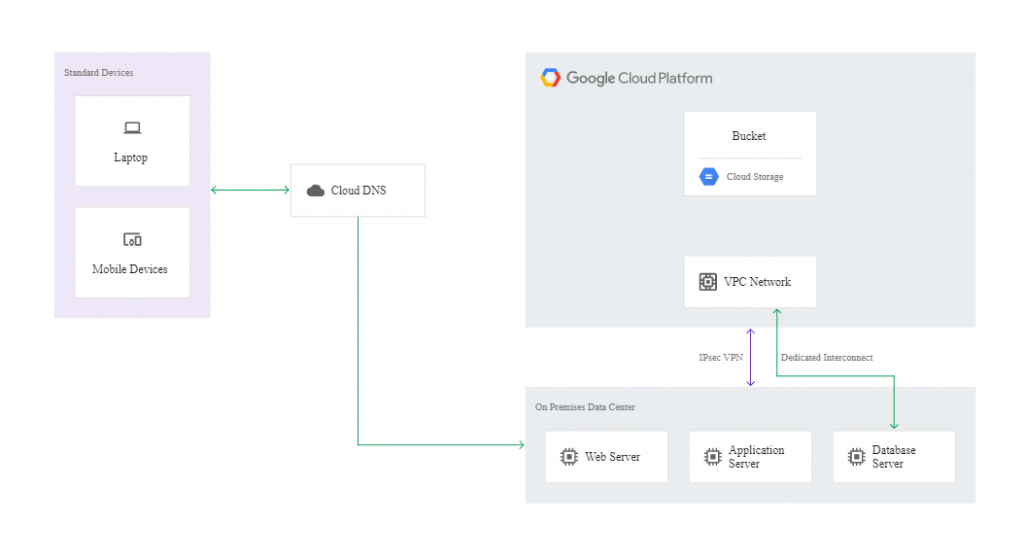
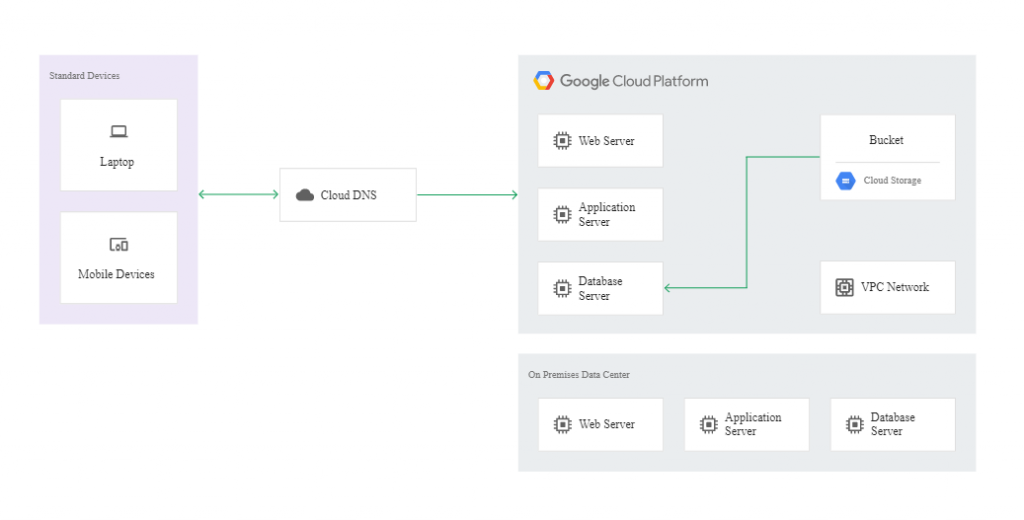
If a disaster occurs, it’s possible to get the affected app back up and running on Google Cloud. To this end, you need to launch your recovery process in the recovery environment created using Deployment Manager. When the instances in the recovery environment are ready to accept traffic, you need to modify the DNS to make it point to the webserver in Google Cloud. The action can be reversed once the production environment is fixed.
The following diagram shows how the recovered environment works in the cold model:
In the warm model, the recovered instance needs to run at all times to receive replicated transactions through asynchronous or semi-synchronous replication techniques. The recovery centre can be the smallest machine capable of running the copies of the system and of the databases. As the instance will be running continuously for a long period of time, sustained use discounts will apply automatically (even up to 30% of savings on the service cost per month).
In this scenario, the snapshot of the virtual machine will play a key role. Here, the DR building blocks include the following services:
- Cloud DNS,
- Cloud Interconnect,
- Self-managed VPN,
- Compute Engine,
- Deployment Manager.
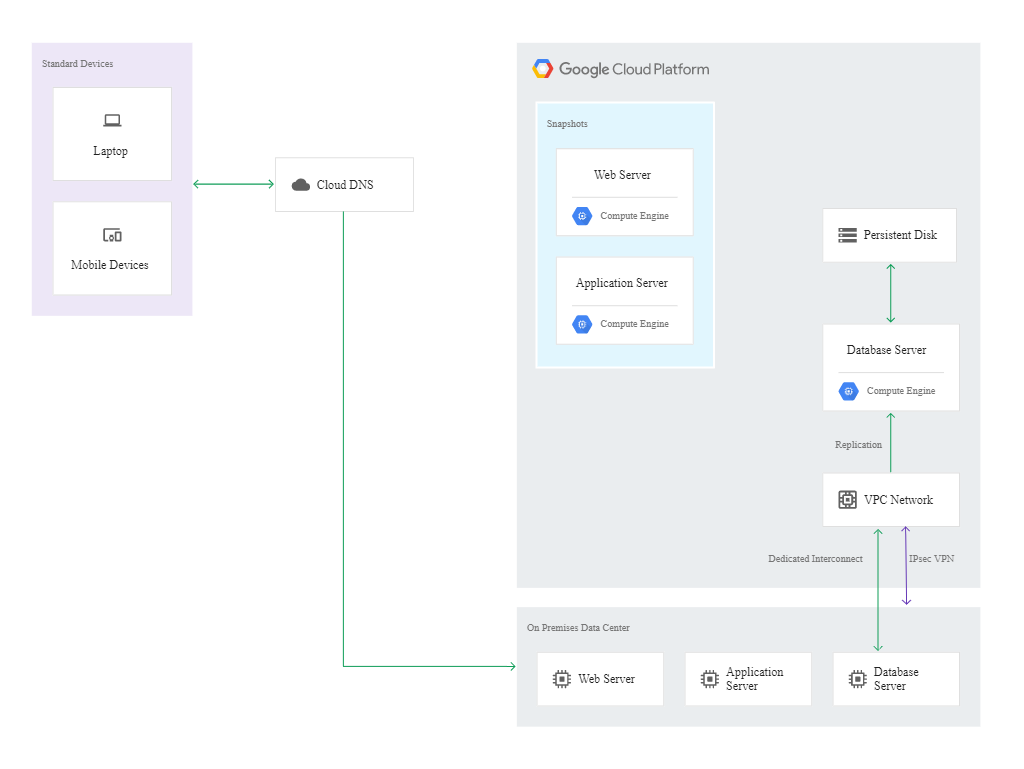
The continuity of operation of the infrastructure is automatically monitored, and the set alerts initiate the process of recovery in response to a failure. If it appears necessary to divert the traffic to Compute Engine machines, the administrator should configure the database system on Google Cloud to make it able to handle the traffic from the production version of the app. This is followed by the deployment of a webserver and application server.
The diagram below shows the configuration after failover to Google Cloud:
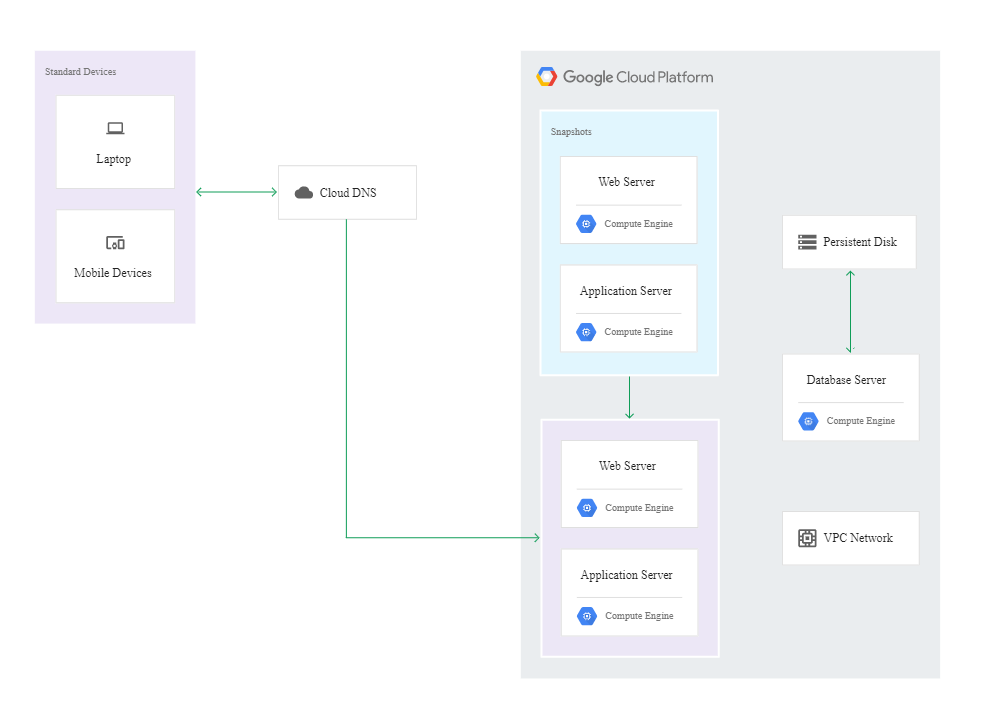
In the hot model, both the on-premise and the cloud-based infrastructures run in the production mode and handle app traffic. In this scenario, the administrator’s involvement is kept to a minimum because the response to the failure and the recovery process are automated.
In this case, the DR building blocks are the following cloud-based services:
- Cloud Interconnect,
- Cloud VPN,
- Compute Engine,
- Managed instance groups,
- Cloud Monitoring,
- Cloud Load Balancing.
The following diagram illustrates an example architecture of the hot model:
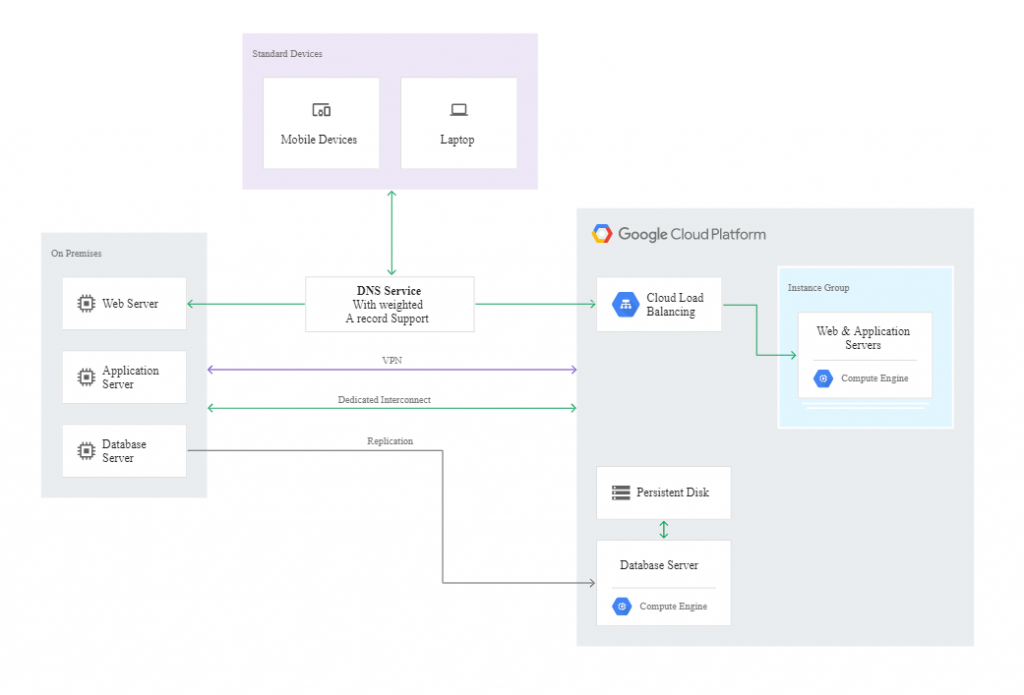
In this case, there is no failover from the primary centre to the backup centre. But it may appear necessary to make some modifications to the settings:
- if your DNS doesn’t reroute the traffic automatically based on a health check failure, you need to manually reconfigure DNS routing to send traffic to the system that’s still up,
- if your database system doesn’t automatically promote a read-only replica to be the writeable primary on failure, you need to intervene to ensure that the replica in question is promoted.
When one of the two infrastructures is running again, it will be necessary to resynchronize the databases between the environments. Since both environments support production workloads, you won’t have to set the primary database. After the databases are synchronized, you can allow production traffic to be distributed across both environments again by adjusting the DNS settings accordingly.
When the production environment is on Google Cloud Platform
In the cold model for a production environment on Google Cloud Platform, we need only one instance to act as the Disaster Recovery Centre. Usually, such an instance is an element of the MIG group used as a backend for internal Load Balancing.
In this scenario, the DR building blocks include the following services:
- Compute Engine,
- Google Cloud Internal Load Balancing.
The following diagram illustrates such an example architecture. No client connections are illustrated because you wouldn’t normally have an external client connect directly to an application server (there would usually be a proxy or web application between the client and the application server).
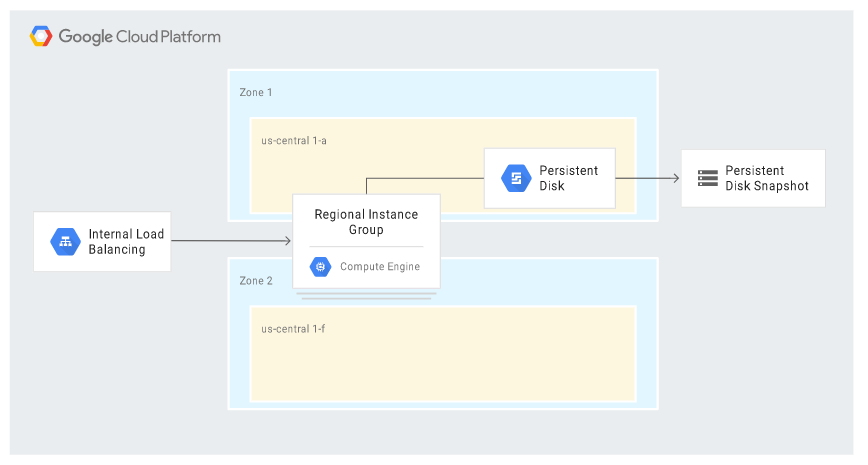
The scenario includes some of the high-availability (HA) features available in Google Cloud. In the event of a disaster, all relevant failover steps take place automatically; the new server receives the same IP address and the same settings as the primary instance. In the event of a zone failure, the MIG in the regional model launches a replacement instance in a different – live – zone, to which the last snapshot taken is attached. The diagram below illustrates such a situation:
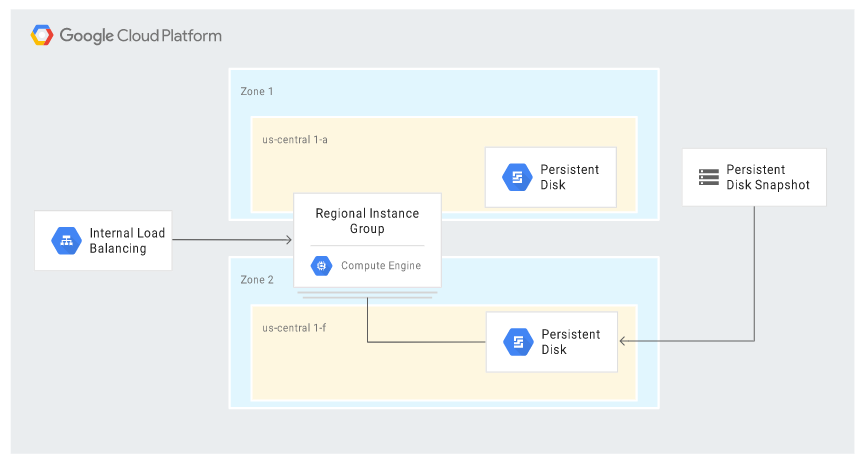
In the warm model, when the primary application runs in the Compute Engine service and a GCE instance fails, it’s possible to run a static version of the website using Cloud Storage.
The recovery components (DR building blocks) in this case include:
- Compute Engine,
- Cloud Storage,
- Cloud Load Balancing,
- Cloud DNS.
The diagram below illustrates such an example architecture:
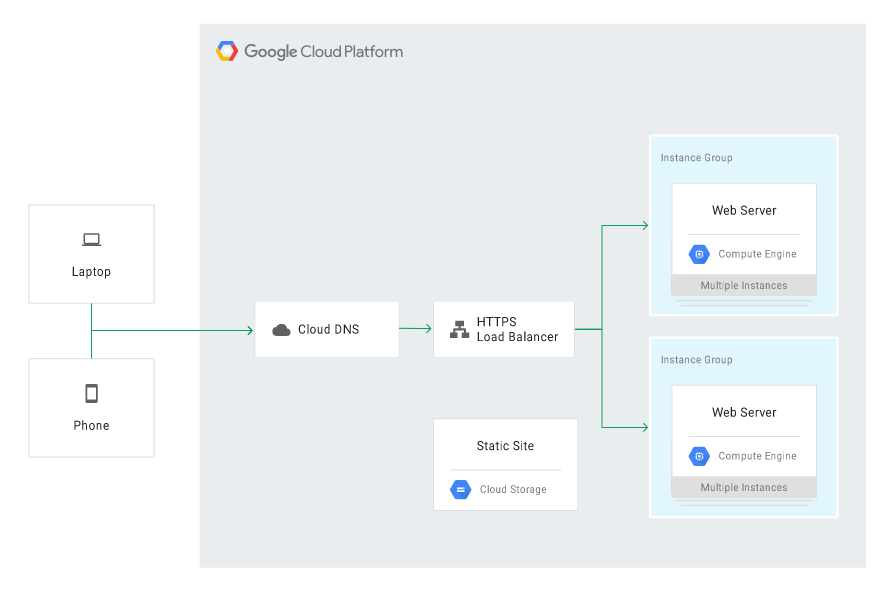
The Cloud DNS should be configured to route the traffic to the primary application in the Compute Engine service and to keep the site in Cloud Storage inactive (dormant) but in the standby mode – in case of a failure. In the event of a GCE failure, Cloud DNS needs to be configured to route the traffic to the static site in Cloud Storage.
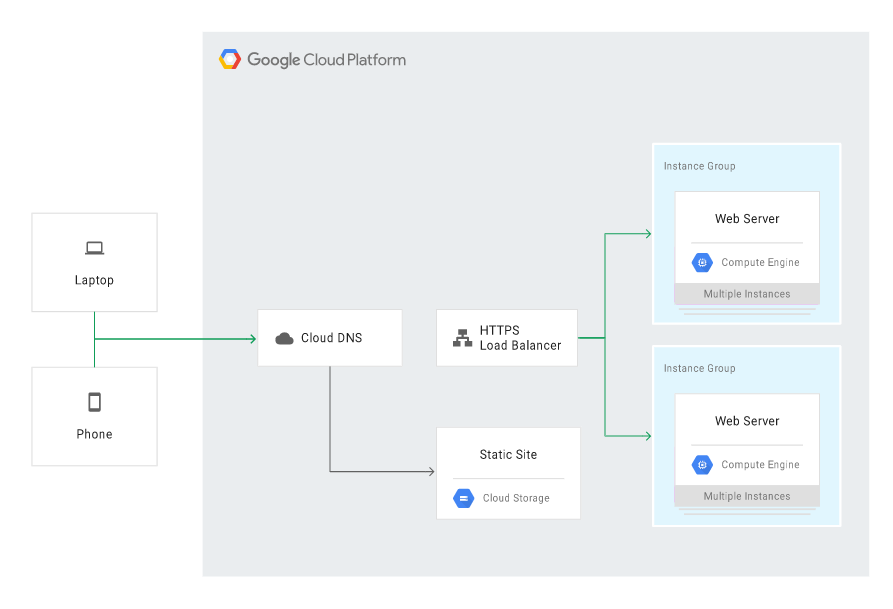
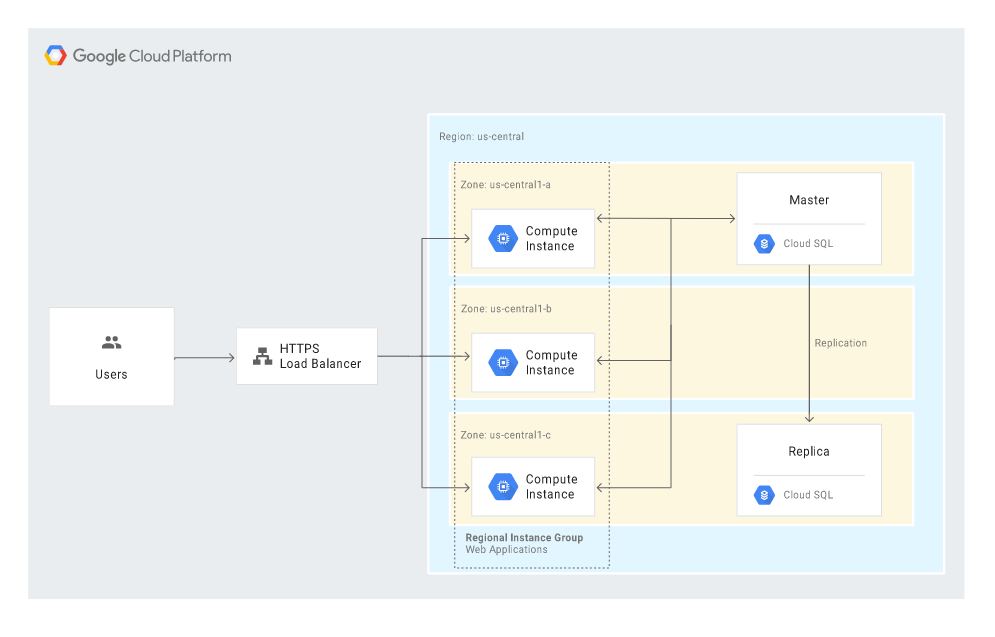
To design a scenario in the hot model, we can use Google services and mechanisms ensuring high availability (HA), such as:
- Managed Instance Groups in the Compute Engine service, in the regional or multi-regional model,
- health checks and automatic repairs in a group of instances,
- Load Balancing,
- managed database in the cloud, e.g. Cloud SQL.
Hot model-based scenarios don’t require the administrator to take any recovery action because all failover steps will occur automatically in the event of a disaster.
Below you can see an example scenario featuring the following building blocks:
- Compute Engine,
- Cloud Load Balancing,
- Cloud SQL.
Disaster recovery scenarios for data
A Disaster Recovery Plan should specify how to avoid losing data in the event of a disaster. The term “data” means databases, log entries, transaction logs as well as database settings and adaptations to the production version, enabling a quick and effective launch.
Backup to the cloud and recovery of data of an app with an on-premise production environment
If you have an app running locally – on your own server or in a private cloud, you can use Google Cloud Platform as a Recovery Data Centre in a few ways:
- backup to Google Cloud Storage by automatically running a relevant script (operation possible to be run using the gsutil command-line tool or the client libraries available for the most common programming languages),
- automatic backup to Google Cloud Storage with the use of Transfer service for on-premises data,
- automatic backup with the use of a third-party solution, e.g. NAS or SAN.
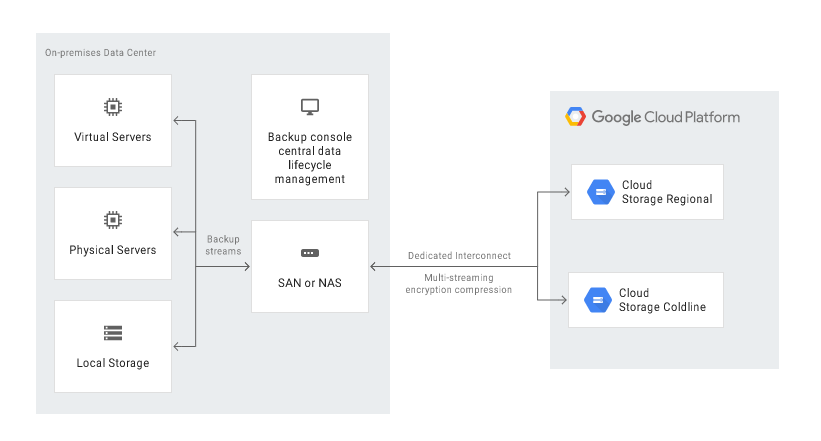
Data can be recovered in two ways:
- by creating a data backup and recovering the data from the recovery server on Google Cloud (see the step-by-step guide),
- by replicating the data to a standby server on Google Cloud (step-by-step guide).
Cloud-based data backup for an app running in GCP
In Google Cloud, we can export data to Google Cloud Storage on a regular basis. We can export data from the Compute Engine VM service, but also from other services – for instance, from database services (e.g. Cloud SQL).

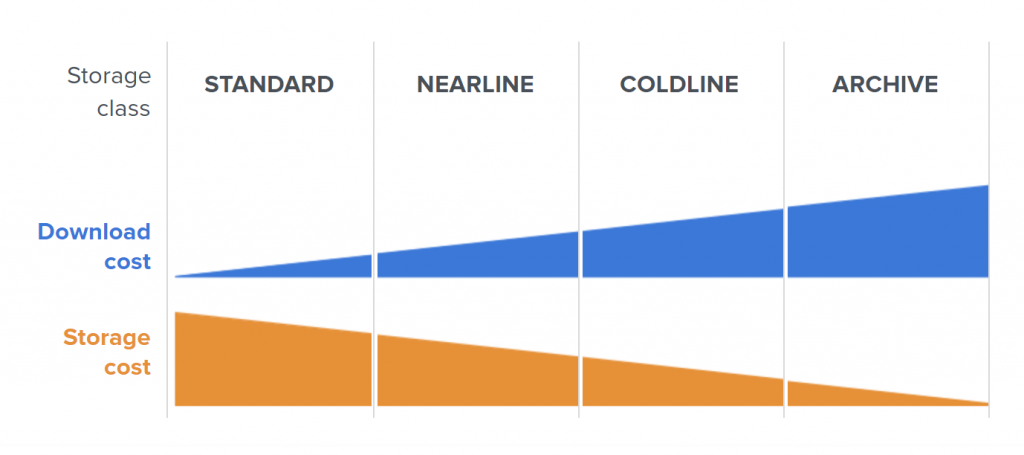
To optimize costs on the path to backup storage, we can make use of GCS storage classes – by changing them manually or choosing automatic class changes within Object Lifecycle Management.
Database backup in Google Cloud
If we use Compute Engine, we can take snapshots, which work like a backup (or even better because the process of restoration is a matter of one click in the console).
The following diagram shows the scenario of automatic recovery after a disaster, with the main building blocks being Compute Engine (with Managed instance groups – MIGs) and Cloud Load Balancing:
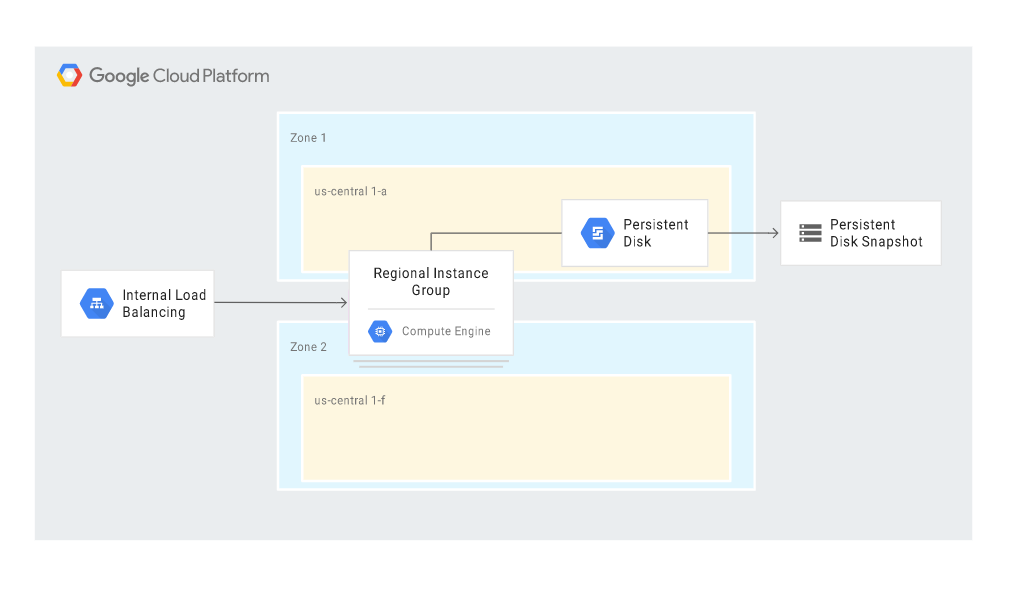
The scenario makes use of some HA (high-availability) features offered in Google Cloud and, basically, limits the administrator’s involvement in the recovery process to a minimum. The relevant steps are initiated automatically in response to a disaster.
In the event a MIG instance fails, a replacement instance is created. The new instance retains the same IP address thanks to the internal load balancer feature, and the instance template and custom image ensure an identical configuration. The replacement instance uses the latest snapshot to restore the documented state. The log files are restored automatically as well.
The case is similar with database recovery. In such a scenario, the configuration creates a replacement database server instance, attaches a persistent disk with backups and transaction log files, and automatically sets the same rules (access levels and roles, firewall settings) as those applied to the production database server.
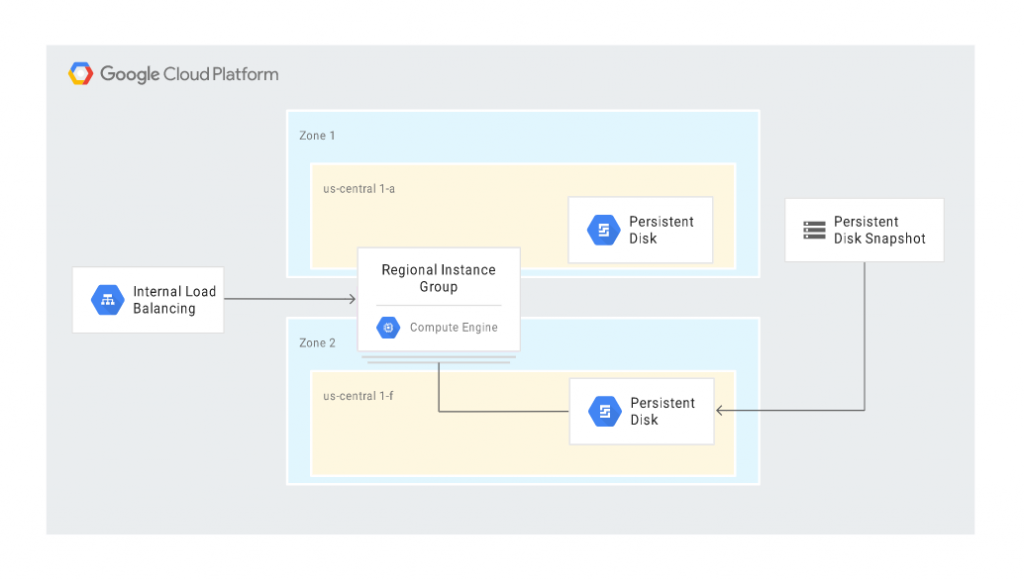
The following diagram shows a recovery scenario where the persistent disk was restored from a snapshot in a different zone:
Cloud-based database management in GCP
To improve backup processes, data recovery and business operations after a disaster, you may take advantage of HA mechanisms available in database services on Google Cloud, designed with scaling in mind. These services include e.g.:
- Cloud Bigtable – a highly-efficient NoSQL base,
- BigQuery – a data warehouse service,
- Firestore – a database for mobile and web apps (available on the Firebase platform),
- Cloud SQL – a MySQL, PostgreSQL, and SQL Server database service,
- Cloud Spanner – a high-availability (99.999%) relational database.
Backup of data of an app running in a different public cloud
Google Cloud Platform’s portfolio includes Storage Transfer Service – a service enabling a relatively easy transfer of on-premise resources or resources stored in other public clouds to Google Cloud Storage. The service is compatible with e.g. Amazon S3 or Azure Blob Storage.
Storage Transfer Service makes it possible to plan and schedule regular synchronization of data or transfers of data from another solution to Google Cloud. In the case of Amazon S3, it’s enough to enter an access key, define the bucket and – optionally – the filters, and then copy the selected objects from S3 to Google Storage.
Zobacz też:
